 We recommend using the Docker Version, since it is the easiest way to repair or upgrade an existing installation. We recommend using the Docker Version, since it is the easiest way to repair or upgrade an existing installation.
Install Dockerapt-get install docker.io
Supported ONLYOFFICE version with PowerFolder Server
| Info |
|---|
| ONLYOFFICE Docs™ Enterprise Edition (EE) is compatible with PFS, the licence can be purchased directly from PowerFolder Sales. |
Latest tested version ONLYOFFICE Docs™ Enterprise Edition v7.5.X We recommend not to use any newer version until it's marked here as "tested" as we can not support versions, which have not been tested by us with the current PowerFolder-Server version. We recommend not to use any newer version until it's marked here as "tested" as we can not support versions, which have not been tested by us with the current PowerFolder-Server version.
| Info |
|---|
|  Due to API and other backend changes, this version is compatible with PFS v20.1.100 and onwards. Due to API and other backend changes, this version is compatible with PFS v20.1.100 and onwards.
|
ONLYOFFICE Changelog: https://helpcenter.onlyoffice.com/installation/docs-changelog.aspx ONLYOFFICE Roadmap: https://helpcenter.onlyoffice.com/installation/docs-roadmap.aspx ONLYOFFICE server does not support DOC / XLS / PPT (MS Office 2003) file types, so please make sure that the file formats are updated to the new ones. Quality Assurance and Test Cases On the basis of test cases we will mark the ONLYOFFICE version compatible and ready to use with PowerFolder Server, the test cases are available under: /wiki/spaces/EDUDE/pages/1007288321 Updating from version 4.x.x When updating from version 4 a re-installation of OnlyOffice is needed. It is not possible to upgrade the version. Additionally, a new license key file is needed to run the latest version. The old license key for version 4.x is invalid for all version above 5.x When updating from version 4 a re-installation of OnlyOffice is needed. It is not possible to upgrade the version. Additionally, a new license key file is needed to run the latest version. The old license key for version 4.x is invalid for all version above 5.x
ONLYOFFICE Docker installationThe Docker version installation is relatively easy to perform. Just follow the guide in the ONLYOFFICE help centre: https://helpcenter.onlyoffice.com/server/integration-edition/docker/docker-installation.aspx Place the keyfile in this path: /app/onlyoffice/DocumentServer/data/ PowerFolder Server configurationAfter the successful installation of ONLYOFFICE server, the Admin has to give manually the URL in the PowerFolder server with the help of web portal. The steps for doing that are given below; - As admin, click on Preferences.
- Click on web on the top drop-down menu.
- Under open files in web, There is an option of providing the URL of installed ONLYOFFICE server.
Prepare ONLYOFFICE certificate and licensemkdir -p /app/onlyoffice/DocumentServer/data/certscp onlyoffice.key /app/onlyoffice/DocumentServer/data/certs/cp onlyoffice.crt /app/onlyoffice/DocumentServer/data/certs/ (Please provide the complete SSL-Chain in the following order "End-User Certificate > Intermediate Certificate (s) > Root Certificate)cp license.lic /app/onlyoffice/DocumentServer/data/chmod 600/app/onlyoffice/DocumentServer/data/certs/onlyoffice.key
| Info |
|---|
| The files should be named as "onlyoffice.key" and "onlyoffice.crt", any individual selected naming is not allowed. |
ONLYOFFICE Auto-Save FunctionTo have ONLYOFFICE save the opened document automatically every minute: docker container listdocker exec -it <container_id> /bin/bashvi /etc/onlyoffice/documentserver/default.json
- Search for
autoAssembly and set enabled to true as well as interval to 1m in that section. supervisorctl restart allexit
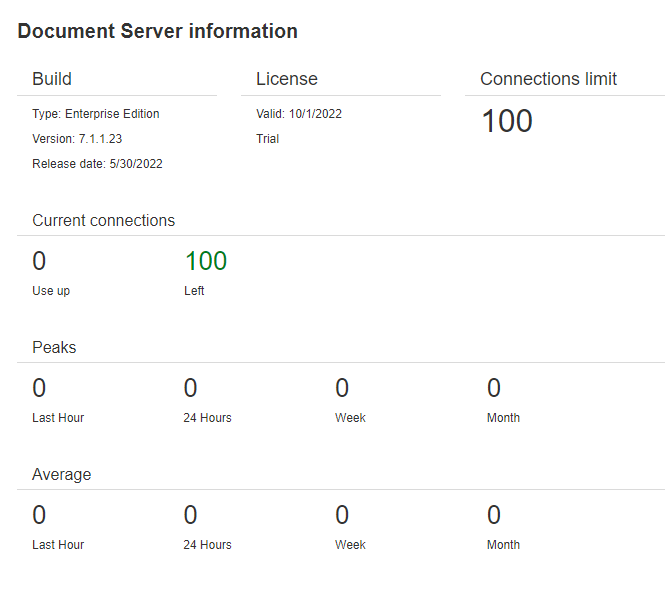
This has to be done after every update of the ONLYOFFICE Docker container! ONLYOFFICE License Info PageOn the ONLYOFFICE Document Server info page you can check the statistics about the maximum and average number of connections for the last hour, twenty-four hours, week or month to estimate the number of concurrent connection you need for the license renewal. ONLYOFFICE provides a PDF on how to check/receive the info page:
In case you get any access denied or similar error message when trying to open the URL, it may be necessary to modify the Nginx component configuration of the ONLYOFFICE installation: - Check your "docker id" using
docker ps - Navigate in the docker
docker exec -it <container_id> bash Change the following config /etc/nginx/includes/ds-docservice.conf Find the section below and comment out the two configurations: | Code Block |
|---|
# Allow server info only from 127.0.0.1
location ~* ^(\/[\d]+\.[\d]+\.[\d]+[\.|-][\d]+)?\/(info|internal)(\/.*)$ {
#  allow 127.0.0.1;
#  deny all;
  proxy_pass http://docservice;
} |
Reload Nginx service with the command inside the docker container: service nginx restart - Open your browser and enter the address of the Document Server and add /info/ to the end of the address. Example: https://documentserver_address/info/
Update ONLYOFFICE IE Docker Please grab the info page with the statistics before upgrading the Docker container as the stats will be lost afterwards! docker container listdocker container stop <container_id>docker container rm <container_id>docker image listdocker rmi -f <image_id>docker system pruneInstall and start the latest the docker image available from ONLYOFFICE using only HTTPS
| Code Block |
|---|
| title | OO Document Server update |
|---|
| sudo docker run -i -t -d -p 443:443 --restart=always \
-v /app/onlyoffice/DocumentServer/logs:/var/log/onlyoffice \
-v /app/onlyoffice/DocumentServer/data:/var/www/onlyoffice/Data \
-v /app/onlyoffice/DocumentServer/lib:/var/lib/onlyoffice \
-v /app/onlyoffice/DocumentServer/db:/var/lib/postgresql onlyoffice/documentserver-ee |
Troubleshooting: Updating Docker DaemonAfter an update of the docker daemon, the container is not working any longer reliably. To resolve this issue the whole server has to get restarted.
Restarting only the docker container or daemon is not fixing this problem. Downgrade ONLYOFFICE IE Docker Please grab the info page with the statistics before upgrading the Docker container, as the stats will be lost afterwards! docker container listdocker container stop <container_id>docker container rm <container_id>docker image listdocker rmi -f <image_id>docker system prune- Downgrade and start the desired ONLYOFFICE version using only HTTPS
| Code Block |
|---|
| title | OO Document Server update |
|---|
| sudo docker run -i -t -d -p 443:443 --restart=always \
-v /app/onlyoffice/DocumentServer/logs:/var/log/onlyoffice \
-v /app/onlyoffice/DocumentServer/data:/var/www/onlyoffice/Data \
-v /app/onlyoffice/DocumentServer/lib:/var/lib/onlyoffice \
-v /app/onlyoffice/DocumentServer/db:/var/lib/postgresql onlyoffice/documentserver-ee:<required ONLYOFFICE version> |
Changing ONLOFFICE Default File Size The default size of the files that can be opened in the ONLOFFICE-Server is 100 MB To change it navigate to /etc/onlyoffice/documentserver/default.json | Code Block |
|---|
| title | Changing Default File Size |
|---|
| "FileConverter": {
"converter": {
"maxDownloadBytes": 104857600,
"downloadTimeout": {
"connectionAndInactivity": "10s",
"wholeCycle": "2m" |
You need to change the value of "maxDownloadBytes" to make it match the size of your file"IN BYTES" After that, restart Document server services :
supervisorctl restart all Restricting ONLYOFFICE to desired DomainsTo change or sert the ipfilter it navigate to /etc/onlyoffice/documentserver/default.json | Code Block |
|---|
| "ipfilter": {
"rules": [{"address": "produktiv@domain.de", "allowed": true},{"address": "testsrv@domain.de", "allowed": true},{"address": "*", "allowed": false}],
"useforrequest": false,
"errorcode": 403 |
Disable JWT Since version 7.2 of the Document Server JWT is enabled by default, please see the change log https://github.com/ONLYOFFICE/DocumentServer/blob/master/CHANGELOG.md#all-editors-2.
If you do not use JWT in your integration, please do the following:
1. Enter the Document Server container with sudo docker exec -it [container_id] bash
2. Open the file /etc/onlyoffice/documentserver/local.json
3. Find section below: | Code Block |
|---|
| "token": {
"enable": {
"request": {
"inbox": true,
"outbox": true
},
"browser": true |
4. Replace true values with false, so the section looks like this: | Code Block |
|---|
| "token": {
"enable": {
"request": {
"inbox": false,
"outbox": false
},
"browser": false |
5. Close the config and restart all though the using command: | Code Block |
|---|
| docker run -e JWT_ENABLED=false -i -t -d -p 443:443 --restart=always \
-v /app/onlyoffice/DocumentServer/logs:/var/log/onlyoffice \
-v /app/onlyoffice/DocumentServer/data:/var/www/onlyoffice/Data \
-v /app/onlyoffice/DocumentServer/lib:/var/lib/onlyoffice \
-v /app/onlyoffice/DocumentServer/db:/var/lib/postgresql onlyoffice/documentserver-ee |
Disable Plugins in ONLYOFFICE ServerTo disable the plugins in the ONLYOFFICE server, please use the following script: | Code Block |
|---|
| cd /var/www/onlyoffice/documentserver/sdkjs-plugins
sudo mkdir -v plugin_backup
sudo cp -av highlightcode macros marketplace mendeley ocr photoeditor speech thesaurus translator youtube zotero plugin_backup
sudo rm -rf highlightcode macros marketplace mendeley ocr photoeditor speech thesaurus translator youtube zotero
sudo systemctl restart ds-docservice.service && systemctl status ds-docservice.service |
Enabling WOPI in OO Docs 7.X To enable WOPI in your OO Docker please follow the following steps: docker container listdocker exec -it <container_id> /bin/bash (For Windows - %ProgramFiles%\ONLYOFFICE\DocumentServer\config\local.json)vi /etc/onlyoffice/documentserver/local.jsonAdd:
| Code Block |
|---|
| "wopi": {
"enable": true
}, |
supervisorctl restart allexit
More Infos: ONLYOFFICE Api Documentation - Overview
Enabling WOPI in OO Docs 8.XTo enable WOPI in your OO Docker please follow the following steps: docker container listdocker exec -it <container_id> /bin/bash (For Windows - %ProgramFiles%\ONLYOFFICE\DocumentServer\config\local.json)vi /etc/onlyoffice/documentserver/default.jsonChange:
| Code Block |
|---|
| "wopi": {
"enable": true, |
supervisorctl restart allexit
Test WOPI URLTo test your WOPI, please use the following code: | Code Block |
|---|
| https://ONLYOFFICE-URL/example/wopi?userid=uid-1&lang=en |
Activate WOPI Server in PFSPlease provide the WOPI-Server URL in the PowerFolder Settings as server admin: 
|