In order to use the Peer-to-Peer functionality of the D2D iOS App, the SSL CA certificate for the D2D protocol must be set in the server settings. D2D SSL CA Certificate and SSL CertificateThe D2D protocol uses SSL, which requires all servers and clients to have a valid SSL certificate. Clients create certificates automatically, which are signed by the server. This requires the server to become a certificate authority (CA), which must be activated in the server settings in the web interface. In Preferences→Network the D2D certificate status can be seen. If the status is "invalid", a new CA certificate can be created with the "Renew D2D Certificate" button. The server then creates a new valid CA certificate, which is stored in server_maintenance/d2d/ca.pem and server_maintenance/d2d/ca.jks. It is not necessary to restart the server after certificate creation or renewal. Create and Renew the D2D-CertificateCreate and Renew the D2D-CertificatePlease make sure that the administrator of the server should create the D2D-Certificate that is used for the encrypted dataflow from device to the Web-Sockets. This certificate is valid only for one year and after that it should be renewed manually through admin-portal under Network-Settings:Please make sure that the administrator of the server should create the D2D-Certificate that is used for the encrypted dataflow from device to the Web-Sockets. This certificate is valid only for one year and after that it should be renewed manually through admin-portal under Network-Settings:  Image Added Image Added
Web Sockets for iOSThe D2D protocol uses Web Socket to communicate with the server. When used in cluster setup, the load balancer needs to be configured to allow protocol upgrades from HTTP to WebSocket. Also, each node must be directly accessible for WebSocket via URL. For example, the node with ID node1 must be accessible for WebSocket via URL powerfolder.example.com/websocket/node1 which needs to be redirected to $internalAddress/websocket. Please follow the Cluster Setup Guide for setting up Apache or nginx. Web Sockets for ClientTo provide web sockets connectivity for clients please follow the Cluster Setup Guide for setting up Apache or nginx. Sample Configuration Precondition: Please update the following configuration in Default.config (sever, global) or PowerFolder.config (for one client) to use the web socket connection: Precondition: Please update the following configuration in Default.config (sever, global) or PowerFolder.config (for one client) to use the web socket connection:
connections.websocket=true
Testing Web Socket ConfigurationWe have prepared a sample HTML-File to test all the complete WebSoket-Contstruction and connectivity of your server including Loadbalancer, please note that you have to cutomize / edit the file and give the address of your server under the field "wsURI". A example is as follows: wsUri = "wss://my.ownserver.com/websocket"; or wsUri = "wss://my.ownserver.com/websocket_client"; Sample test file for connection check| Code Block |
|---|
| language | xml |
|---|
| title | websocket |
|---|
| <!DOCTYPE html>
<meta charset="utf-8" />
<title>WebSocket Test</title>
<script language="javascript" type="text/javascript">
var wsUri = "wss://my.ownserver.com/websocket";
var output;
function init()
{
output = document.getElementById("output");
testWebSocket();
}
function testWebSocket()
{
websocket = new WebSocket(wsUri);
websocket.onopen = function(evt) { onOpen(evt) };
websocket.onclose = function(evt) { onClose(evt) };
websocket.onmessage = function(evt) { onMessage(evt) };
websocket.onerror = function(evt) { onError(evt) };
}
function onOpen(evt)
{
writeToScreen("CONNECTED");
doSend("WebSocket Test");
}
function onClose(evt)
{
writeToScreen("DISCONNECTED");
}
function onMessage(evt)
{
writeToScreen('<span style="color: blue;">RESPONSE: ' + evt.data+'</span>');
websocket.close();
}
function onError(evt)
{
writeToScreen('<span style="color: red;">ERROR:</span> ' + evt.data);
}
function doSend(message)
{
writeToScreen("SENT: " + message);
websocket.send(message);
}
function writeToScreen(message)
{
var pre = document.createElement("p");
pre.style.wordWrap = "break-word";
pre.innerHTML = message;
output.appendChild(pre);
}
window.addEventListener("load", init, false);
</script>
<h2>WebSocket Test</h2>
<div id="output"></div> |
Sample FileThe downloadable test file: websockets.html ResultsAfter a successful of web sockets on your system, you will get: 
After an unsuccessful setup, the results are as follows: 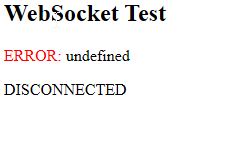
|