It is possible to create organizations as a premium user. With the organization you can manage all accounts inside the organization, create new accounts and provide folders for the complete organization. Organization DashboardIf you are the admin of an organization you can overview all important information about your organization in you dashboard. There you can see how many user accounts are used, how much quota of the organization is assigned to your user accounts and which groups are connected to your organization. 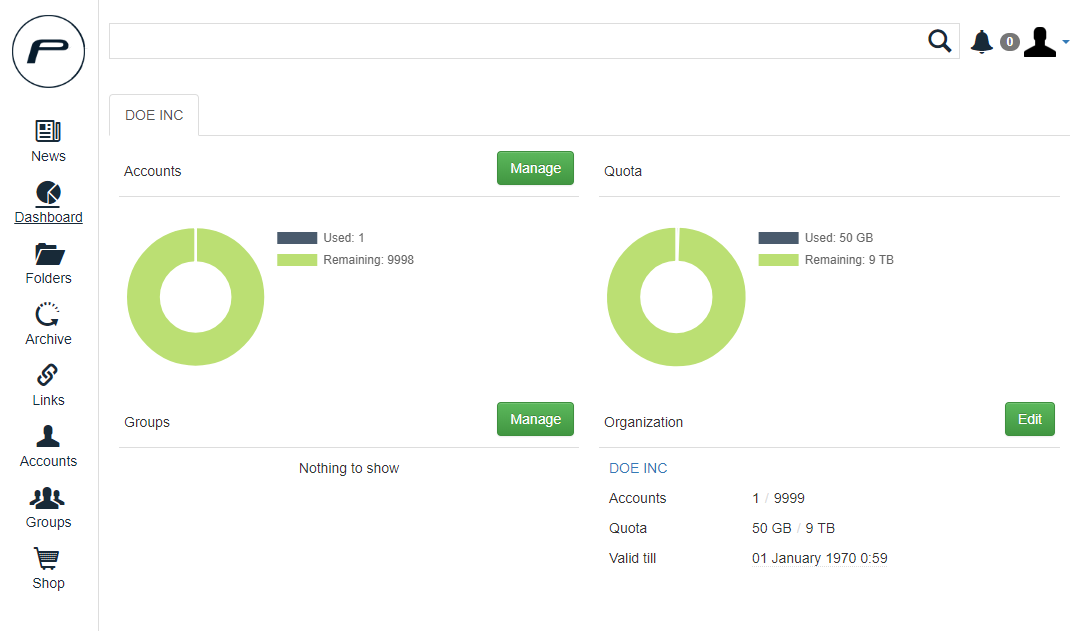 Image Removed Image RemovedEditing the organizationWhen you want to edit the organization you can click on Edit on your dashboard beneath the heading Organization. In the new dialog you can edit the settings as you wish. All changes to the quota are showing up in the bar at the bottom of this dialog summarizing how your changes are affecting your organizations quota. 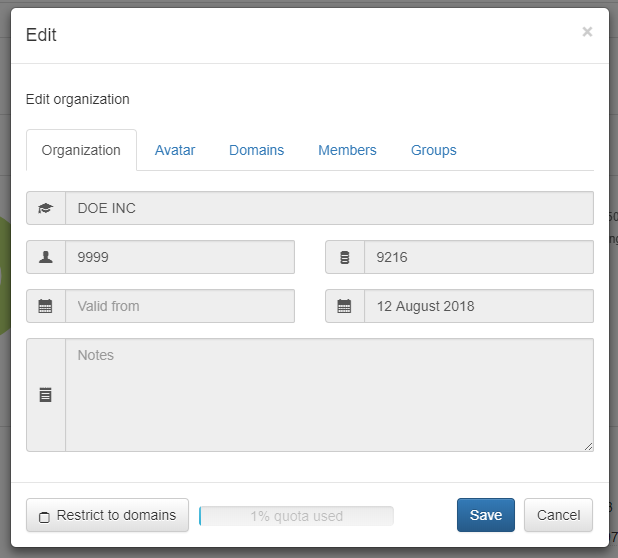 Image Removed Image Removed
Organization tab:In this tab you can't edit anything as an organization admin. Only admin with higher permissions can edit those details. Avatar tab:Here you can upload an avatar that represents your organization in lists. Domains tab:With this you can set your maildomains. It is possible to limit access to the organization by those domains. Members tab:This is a list of all members that are added to your organization with the respective permissions. There are two permissions possible: Is member and Is admin. Groups tab:Here you can add groups to the organization. All shares that are accessable for the group are also accessable for the organization. Sharing new folders with the group results in sharing those folder with the complete organization. Managing users in an organizationAs an organization admin you can add new users, edit existing users or delete users. 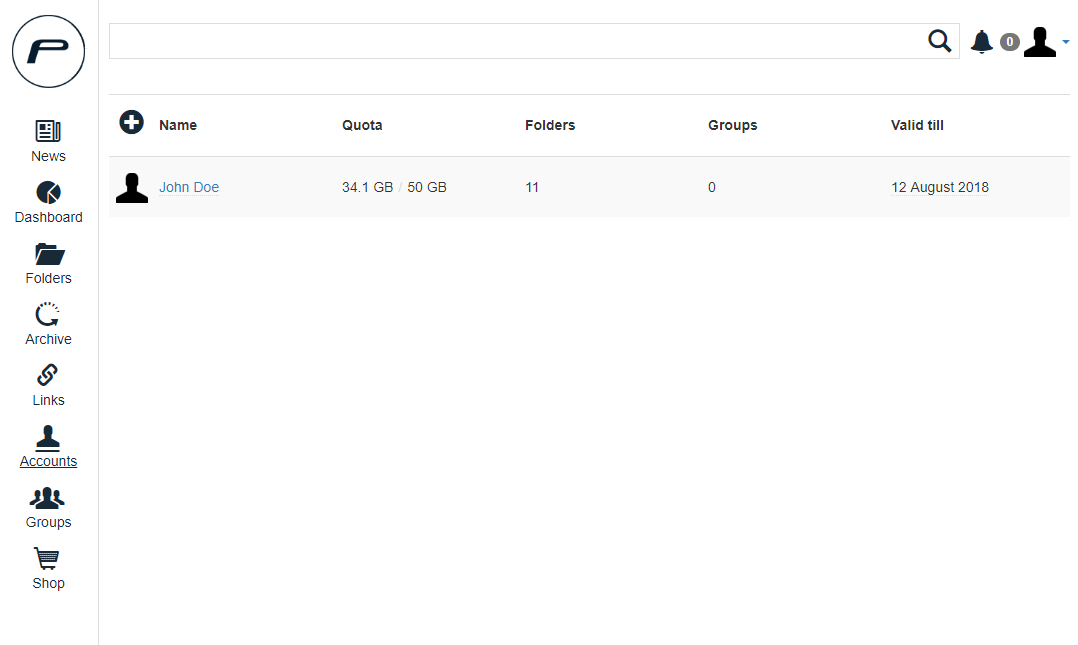 Image Removed Image Removed
Creating/Editing user accountsCreating a new user is very simple. Just press the  Image Removed and start entering the user information.When you want to edit an existing user just press on the accounts name. Image Removed and start entering the user information.When you want to edit an existing user just press on the accounts name. | Info |
|---|
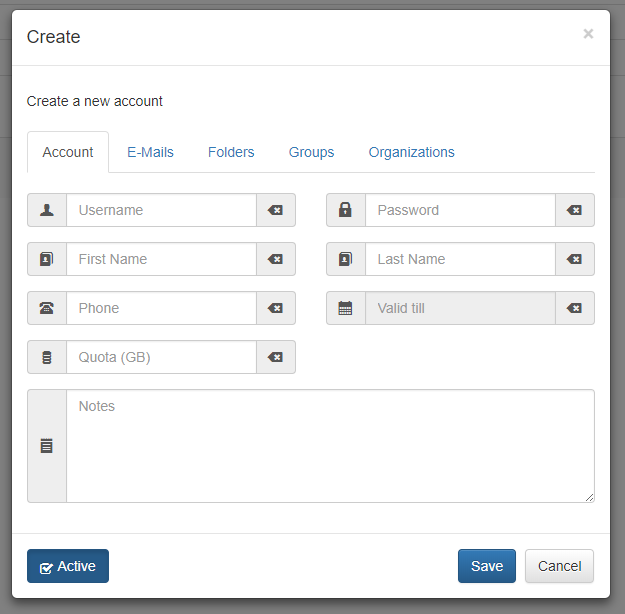
When you unmark the button Active the user is not able to log in. This can also get changed when a user already got created to remove access of the user to the cloud space. |
Account tab:Username: This is the login name for the user. It is the best choice to use the users email address as a username but you are free to choose the name that you wish to.Password: Set a password for the account. The user can change this password later in his or her account profile.First Name: This is the first name of the user. It will get used for the display name in the account overview.Last Name: Similiar to first name this field gets used for the display name.Phone: The phone number of the user.Valid till: This is the expiration date for the user. If you have a temporary user account you can use this to limit the access to the service automatically by a date that you choose.Quota (GB): Here you enter the value of GB that should be available as storage space for the user. Keep in mind that it is not possible to assign more quota than your organization has left.Notes: General notes for the user account. You may enter every custom text.
- Here you can enter additional email addresses for the user account. They can get used to log in or to share files to this user.
Folders tab:- Here you can create new folders for the user or assign existing folders to the account.
Groups tab:- In this tab you can assign a group to the user or create a new one with the user assigned.
Organizations tab:This tab allows you to assign permissions for the organization to the user or add a second organization. Keep in mind that this user will consume in both organizations a user slotAls Premium Nutzer ist es möglich Organisationen anzulegen. Mit einer Organisation können Sie selbstständig Benutzerkonten in dieser Organisation anlegen, bearbeiten oder löschen. Außerdem können Ordner für die gesamte Organisation freigegeben werden. Organisations AdminübersichtFalls Sie der Admin einer Organisation sind, können Sie alle wichtigen Informationen im Dashboard erhalten. Sie erhalten auf einen Blick übersicht über die zugewiesene Quota, die Anzahl der Accounts, die Gruppen innerhalb Ihrer Organisation und die Laufzeit Ihrer Lizenz. Image Added
Organisation bearbeitenWenn Sie Ihre Organisation bearbeiten möchten drücken Sie einfach auf Bearbeiten neben dem Titel "Organisation" in Ihrem Admin Dashboard. Ein Dialog mit allen Informationen der Organisation öffnet sich. Sie können Sie nach belieben bearbeiten. Sollte sich durch Ihre Veränderung an der Quotazuweisung etwas verändern, wird dies in der Quotaleiste unten angezeigt.
Image Added Reiter Organisation:In diesem Reiter können Sie als normaler Organisationsadmin nichts verändern. Dafür benötigen Sie höhere Adminberechtigung. Hier wird Ihnen die zugewiesene Quota, die Anzahl der maximalen Benutzerkonten und die Laufzeit Ihrer Organisation angezeigt. Reiter Avatar:Hier können Sie einen Avatar hochladen, der für die Organisation angezeigt wird. Reiter Domains:Hier können Sie Ihre Maildomains hinterlegen. Es ist möglich zugriff auf die Organisation auf diese Domains zu beschränken. Reiter Mitglieder:Hier werden Ihnen alle aktuellen Mitglieder angezeigt mit der entsprechenden Berechtigung. Es gibt zwei verschiedene Berechtigungen: Mitglied und Admin. Reiter Gruppen:Sie können hier Gruppen zu Ihrer Organisation hinzufügen oder anlegen.
Verwaltung von BenutzerkontenAls Organisationsadmin können Sie neue Nutzer anlegen, bestehende bearbeiten oder löschen. Image Added
Erstellen/Bearbeiten von Nutzerkonten
Einen neuen Benutzer anzulegen ist sehr einfach. Drücken Sie einfach auf die Schaltfläche Image Added und geben Sie Informationen des neuen Benutzerkontos ein. | Info |
|---|
Wenn Sie die Schaltfläche Aktivieren abhaken, ist es für den Nutzer nicht möglich sich anzumelden. Dies kann auch genutzt werden, um bestehende Benutzer auszusperren. |
Reiter Benutzerkonto:- Benutzername: Dies ist der Loginname des Benutzers. Die beste Wahl ist es, hier die primäre E-Mailadresse des Nutzer zu hinterlegen.
- Passwort: Setzen Sie einen Passwort für das Benutzerkonto. Dies kann der Nutzer später selbstständig ändern.
- Vorname: Hier können Sie den Vornamen des Nutzers eingeben. Dieser wird in der Accountübersicht angezeigt anstatt des Benutzernamens.
- Nachname: Dies Verhält sich wie der Vorname und wird anstatt des Benutzernamens angezeigt. Wenn beide Felder gefüllt werden, werden beide zum vollen Namen zusammen angezeigt.
- Telefon: Hier kann die Telefonnummer des Nutzers hinterlegt werden.
- Gültig bis: Setzen Sie hier ein Datum ab wann der Nutzer sich nicht mehr einloggen kann. Dies ist sehr hilfreich für zeitlich begrenzte Mitarbeiter
- Quota (GB): Tragen Sie den Speicherplatz dem der Nutzer zugewiesen werden soll ein. Denken Sie daran, dass Sie nicht mehr Quota zuweisen können, als in der Organisation verfügbar sind.
- Notizen: Hier können Notizen hinterlegt werden. Jeder eigene Text ist möglich.
Reiter E-Mails:- Sie können weitere E-Mailadressen des Benutzers hier eintragen. Diese können ebenfalls für den Login verwendet werden oder um Ordner an diesen Nutzer freizugeben.
Reiter Ordner:- In diesem Reiter können Sie Ordner für ein Nutzerkonto anlegen oder bestehende Ordner löschen. Zusätzlich können Sie auch jegliche Berechtigungen auf Ordnern für diesen Nutzer bearbeiten.
Reiter Gruppen:- Sie können den Nutzer über diesen Reiter direkt zu Gruppen hinzufügen.
Reiter Organisationen:- Hier können Sie die Berechtigung des Nutzers für diese Organisation ändern oder den Nutzer zu einer weiteren Organisation hinzufügen. In diesem Fall verbraucht der Nutzer aber in beiden Organisationen Quota und einen Nutzerplatz.
|